Showing posts with label Tips. Show all posts

Finaly Google AdSense Between Your Post !

Finally Blogger has launched its new feature for inserting google Adsense between your posting. This feature is very usefull, well at least you dont have to change some string in the google Adsense code so it'll safe more time...This is how to insert your Google Adsense between your post:
  1. Log into your Blogger account at http://www.blogger.com .
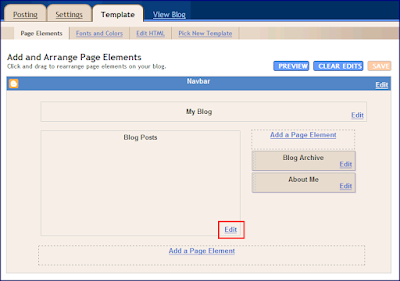
  2. Visit your blog's Template tab and click on the Page Elements link.
  3. Click Edit in the Blog Posts section.


  4. Check the box next to Show Ads Between Posts. You can then select how often you'd like your ads to appear, such as once after every post or once after every other post.


  5. Customize the ads and click on Save Changes when you're done.
BRAVO GOOGLE, BRAVO BLOGGER! you know what your customer want!!!

Windows XP Narrator

Feeling lonely when work with your computer, well make your computer talk. Here's how:
  1. Select Start, Programs, Accessories, Accessibility, Narrator.
  2. Or press the Windows key plus the letter "U" to open the Utility Manager. (This is easier)
To turn Narrator off, click the Exit button or right-click its taskbar item and select Close.

Behind Windows XP Splash Screen

Have you ever know what's goin on behind Windows splash screen?
Here's how you can find out:

  • Right click My Computer, Properties, Advanced, Startup and Recovery, Edit.
  • Edit BOOT.INI. Add "/SOS" right after "/fastdetect" with a space between. The line will look something like this: multi(0)disk(0)rdisk(0)partition(1)\WINDOWS="Microsoft Windows XP Professional" /fastdetect /SOS.
When you're finished. The first part, multi(0)..... may not be the same on your machine. Upon restarting, the splash screen will be gone. If you have done with this you can be re-enabled by removing the new switch.

How To Remove Search Box On Firefox


If you have no use of search box provide on Firefox browser, you can remove it like any other element in your Firefox toolbar. here's how:
  1. Right-click on any open space in your toolbar,
  2. select "Customize" from the context menu. A Customize Toolbar dialog will then appear
  3. Simply click on any part of Firefox's Search box (your mouse will transform into a hand icon when hovering over the Search box) and drag it into the Customize Toolbar window. Now you see it; now you don't!
Sometimes the 12" laptop user need this tips to expand their browser view.

Add to Technorati Favorites

How to put YouTuBe on Blogger

Do you want to add a YouTuBe clip on your posting? It's so simple! Here's how:

This if you want to put YouTuBe clips on side bar
  1. Go to the Blogger Dashboard
  2. go to the Template tab
  3. click Add a Page Elemen
  4. select Video Bar. This lets you add a vertical bar of YouTube video clips, based on defined search elements.
Or if you want to put it on your posting you can just use the embed source code given below the description on the Youtube page. Then, you just post that code into the code section of you blog. Just click on code, and then copy and paste the code where you want the video to appear on your page.

How To Hide Your Folder in Windows XP

Here's some guide to hide your personal folder on your Windows XP computer:
  1. Make a new folder on the root drive (eg. C:>), do this to avoid the common placement of personal folder on My Document folder.
  2. Now that you have your folder created in a strange location and your files stored in that folder, we can make it hidden. Setting a folder to Hidden in Windows XP is simply changing one of the properties of the folder, i.e. 0 means not hidden and 1 means hidden. Windows Explorer reads this property and appropriately shows or hides the folder. However, there is an option in Windows Explorer called “Show hidden files and folders” that will display all folders no matter what the hidden property value is set to.
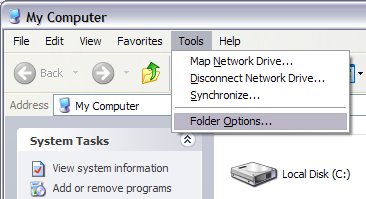
  3. We need to change that setting so that hidden files and folders are not to be shown. In order to do this, click on My Computer from your desktop and from the menu click on Tools and then Folder Options.

  4. Click on the View tab and under the Hidden Files and Folders section, choose the radio button that says “Do not show hidden files and folders”.

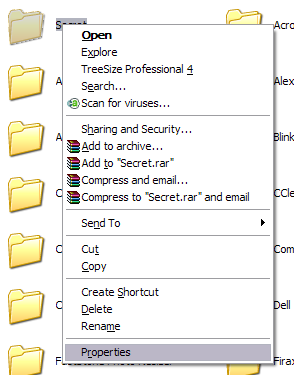
  5. Click OK to save the changes. Usually this option is already set by default to hide files and folders, but it’s good to check anyway just to make sure. Ok, now to hide the folder itself, go into the folder that has the folder you want to hide, right-click on it and choose Properties.

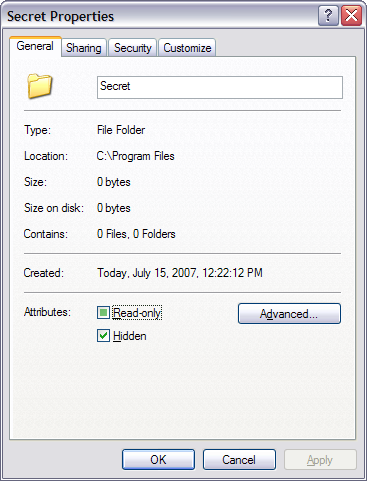
  6. On the General tab, check the box in the Attributes section named Hidden.

  7. Click OK and your folder should no longer be visible in the current window you have open. It’s hidden and you won’t be able to see it unless you do the same procedure as mentioned above and change the option back to Show Hidden Files and Folders. Now if you want to save anything into the hidden folder, you could un-hide it and then save the file and then re-hide it, but that’s really not necessary.

    In order to save a file to a hidden folder, all you need to do is specify the entire path in the File Name box. Fox example, if you’re saving a Word document, you could save the files to the hidden folder by typing in C:\Program Files\Secret\filename.doc and click Save.

And that’s it! A very simple and easy way to hide a folder that will probably work on most people unless they are computer geeks!!

How To Disable Online Drivers Search

The required driver is missing when you are installing a device. Windows XP Prompts you to go online and search for the driver using Windows Updates. However, experience tell you that is absolutely useless and will only be adding to your hassle.

Usually a driver is included on a CD provided with the device you have purchased. If this is not the case for some reason, you can always download the software from the device manufacturer's website. Why not disable the unnecessary request to search for drivers when you can install them much faster yourself.

The Go to : "Start > Run" and type "gpedit.msc"(without quotes) and navigate to:

Local Computer Policy > Computer Configuration > Administrative Templates > System

Section on the left pane of the window. Now choose and double click on "Turn off Windows Update device driver search prompt". In the window that appears, chosse "Disable" and apply the settings.

Changing the Internet Explorer Title

If you're bored with the same old title on your Internet Explorer bar, you change the text appear in that bar. Why would you do this? say you want to give a private look to your web browser on a internet caffe you own, or on your computer, you can do it easily. How to do this?
  1. Start Regedit
  2. Go to HKEY_CURRENT_USER\Software\Microsoft\Internet Explorer\Main\Window Title
  3. Enter what you want appear in the title bar
Now enjoy your personalized Internet Explorer bar...

On Screen Keyboard


Hi guys!
Wanna use on screena keyboard? here's how:
  1. click start button
  2. click run
  3. on the dialogue box type osk
An on screen keyboard will shown up. Use this if you're using a public computer to access important and private data.

How To Disable Error Reporting

Sometimes windows error reporting make us panic and try to fix it but sometime we broke the system. Unfortunately not all windows error reporting a critical error. How to disable windows error reporting?, here's how:

  • Open Control Panel
  • Click on Performance and Maintenance.
  • Click on System.
  • Then click on the Advanced tab
  • Click on the error-reporting button on the bottom of the windows.
  • Select Disable error reporting.
  • Click OK
  • Click OK
Good Luck

Change Out Your Pointer Scheme

Tired of seeing your pointer as an arrow or an hourglass all the time? Windows XP offers a number of alternative pointer schemes other than default pointer, such as Dinosaur, Ocean, Sports and many more.


How to do this?
  1. Open the Control Panel
  2. double-click Mouse
  3. select the Pointers tab
  4. Next to Schemes, click the down arrow and select a scheme to preview its pointers
  5. Click OK to apply the scheme to your desktop. Simple as that
(If you start in Category view, select Appearance and Themes, then click Mouse Pointers under "See Also.")

Good Luck!